How Does a Flip-Flop Actually Work Inside?
In the D Flip-Flop Tutorial, we learned what flip-flops do and their timing requirements (setup time, hold time, clock-to-Q delay). But how are they actually built inside?
Master-Slave Architecture
Most D flip-flops use a master-slave design with two latches in series:
Master latch — Captures input D when clock is HIGH
Slave latch — Captures master’s output when clock is LOW
Result: Output Q only changes on the clock edge (HIGH→LOW transition)
This two-stage design is what creates edge-triggered behavior. The master samples the input during one half of the clock cycle, then the slave transfers it to the output during the other half.
Source
import matplotlib.pyplot as plt
from matplotlib.patches import FancyBboxPatch, Circle, FancyArrowPatch
import matplotlib.patches as mpatches

fig, ax = plt.subplots(figsize=(14, 8))
ax.axis('off')
ax.set_xlim(0, 140)
ax.set_ylim(0, 80)
ax.set_title('D Flip-Flop: Master-Slave Architecture', fontsize=16, fontweight='bold', pad=20)

# Master latch box
master = FancyBboxPatch((20, 35), 35, 20, boxstyle='round,pad=0.5',
                        facecolor='#dbeafe', edgecolor='#3b82f6', linewidth=3)
ax.add_patch(master)
ax.text(37.5, 45, 'Master\nLatch', ha='center', va='center',
        fontsize=12, fontweight='bold', color='#1e40af')

# Slave latch box
slave = FancyBboxPatch((75, 35), 35, 20, boxstyle='round,pad=0.5',
                       facecolor='#fef3c7', edgecolor='#f59e0b', linewidth=3)
ax.add_patch(slave)
ax.text(92.5, 45, 'Slave\nLatch', ha='center', va='center',
        fontsize=12, fontweight='bold', color='#92400e')

# D input
ax.annotate('', xy=(20, 45), xytext=(5, 45),
           arrowprops=dict(arrowstyle='->', color='#374151', lw=3))
ax.text(3, 45, 'D', fontsize=14, fontweight='bold', ha='right', va='center')

# Q output
ax.annotate('', xy=(135, 45), xytext=(110, 45),
           arrowprops=dict(arrowstyle='->', color='#374151', lw=3))
ax.text(137, 45, 'Q', fontsize=14, fontweight='bold', ha='left', va='center')

# Connection between master and slave
ax.annotate('', xy=(75, 45), xytext=(55, 45),
           arrowprops=dict(arrowstyle='->', color='#6b7280', lw=2.5))
ax.text(65, 48, 'Q_master', fontsize=10, ha='center', color='#6b7280', style='italic')

# Clock signal to master
ax.plot([37.5, 37.5], [20, 35], color='#3b82f6', lw=2.5)
ax.text(37.5, 17, 'CLK', fontsize=11, fontweight='bold', ha='center', color='#3b82f6')

# Clock to inverter
ax.plot([65, 65], [20, 25], color='#3b82f6', lw=2.5)

# Inverter (NOT gate)
inverter_triangle = mpatches.Polygon([[62, 25], [68, 25], [65, 30]],
                                    facecolor='white', edgecolor='#6b7280', linewidth=2)
ax.add_patch(inverter_triangle)
inverter_circle = Circle((65, 31), 1.5, facecolor='white', edgecolor='#6b7280', linewidth=2)
ax.add_patch(inverter_circle)

# Inverted clock to slave
ax.plot([65, 65], [32.5, 35], color='#f59e0b', lw=2.5)
ax.plot([92.5, 92.5], [32.5, 35], color='#f59e0b', lw=2.5)
ax.plot([65, 92.5], [32.5, 32.5], color='#f59e0b', lw=2.5)
ax.text(92.5, 30, 'CLK', fontsize=11, fontweight='bold', ha='center', color='#f59e0b')
ax.text(95, 30, '(inverted)', fontsize=9, ha='left', color='#f59e0b', style='italic')

# Clock signal path (shared)
ax.plot([37.5, 65], [20, 20], color='#3b82f6', lw=2.5)
ax.plot([10, 37.5], [20, 20], color='#3b82f6', lw=2.5)
ax.text(8, 20, 'CLK', fontsize=11, fontweight='bold', ha='right', va='center', color='#3b82f6')

# Timing annotation boxes
# Master active
master_box = FancyBboxPatch((15, 62), 45, 13, boxstyle='round,pad=0.3',
                           facecolor='#dbeafe', edgecolor='#3b82f6', linewidth=2, alpha=0.8)
ax.add_patch(master_box)
ax.text(37.5, 68.5, 'Active when CLK = HIGH', ha='center', fontsize=10, color='#1e40af', fontweight='bold')
ax.text(37.5, 65, 'Captures D input', ha='center', fontsize=9, color='#1e40af')

# Slave active
slave_box = FancyBboxPatch((70, 62), 45, 13, boxstyle='round,pad=0.3',
                          facecolor='#fef3c7', edgecolor='#f59e0b', linewidth=2, alpha=0.8)
ax.add_patch(slave_box)
ax.text(92.5, 68.5, 'Active when CLK = LOW', ha='center', fontsize=10, color='#92400e', fontweight='bold')
ax.text(92.5, 65, 'Transfers to Q output', ha='center', fontsize=9, color='#92400e')

# Key insight box
insight_box = FancyBboxPatch((10, 2), 120, 12, boxstyle='round,pad=0.5',
                            facecolor='#f0fdf4', edgecolor='#10b981', linewidth=2.5, alpha=0.9)
ax.add_patch(insight_box)
ax.text(70, 10, 'Key Insight: Only ONE latch is active at a time!',
        ha='center', fontsize=11, fontweight='bold', color='#065f46')
ax.text(70, 6, 'Master captures on HIGH → Slave transfers on LOW → Output changes at falling edge',
        ha='center', fontsize=10, color='#047857', style='italic')

plt.tight_layout()
plt.show()
Matplotlib is building the font cache; this may take a moment.

Why This Visualization Matters
Understanding the nanosecond-level timing inside the flip-flop reveals:
Why setup and hold times exist — The master latch needs time to stabilize before the clock edge
Why there’s clock-to-Q delay — The slave latch takes time to propagate the signal to Q
How edge triggering works — See the master/slave handoff in slow motion
What happens during metastability — Watch what occurs when timing is violated
This interactive visualization lets you step through each nanosecond and see the internal signals as the flip-flop captures and outputs data.
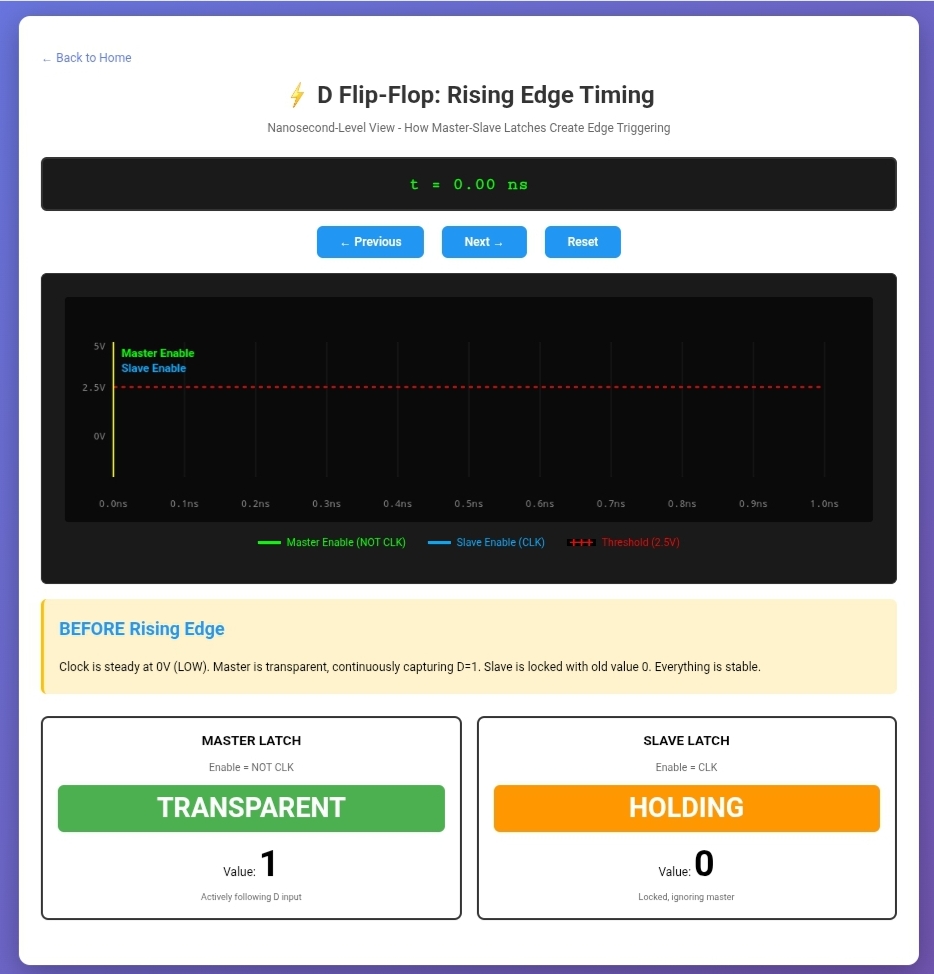
Click image above to launch the interactive visualization
Launch the Interactive Visualization
Tip: After exploring the visualization, you’ll have a much deeper understanding of why the timing parameters from the tutorial are critical for reliable operation.